Monday, 25 March 2019

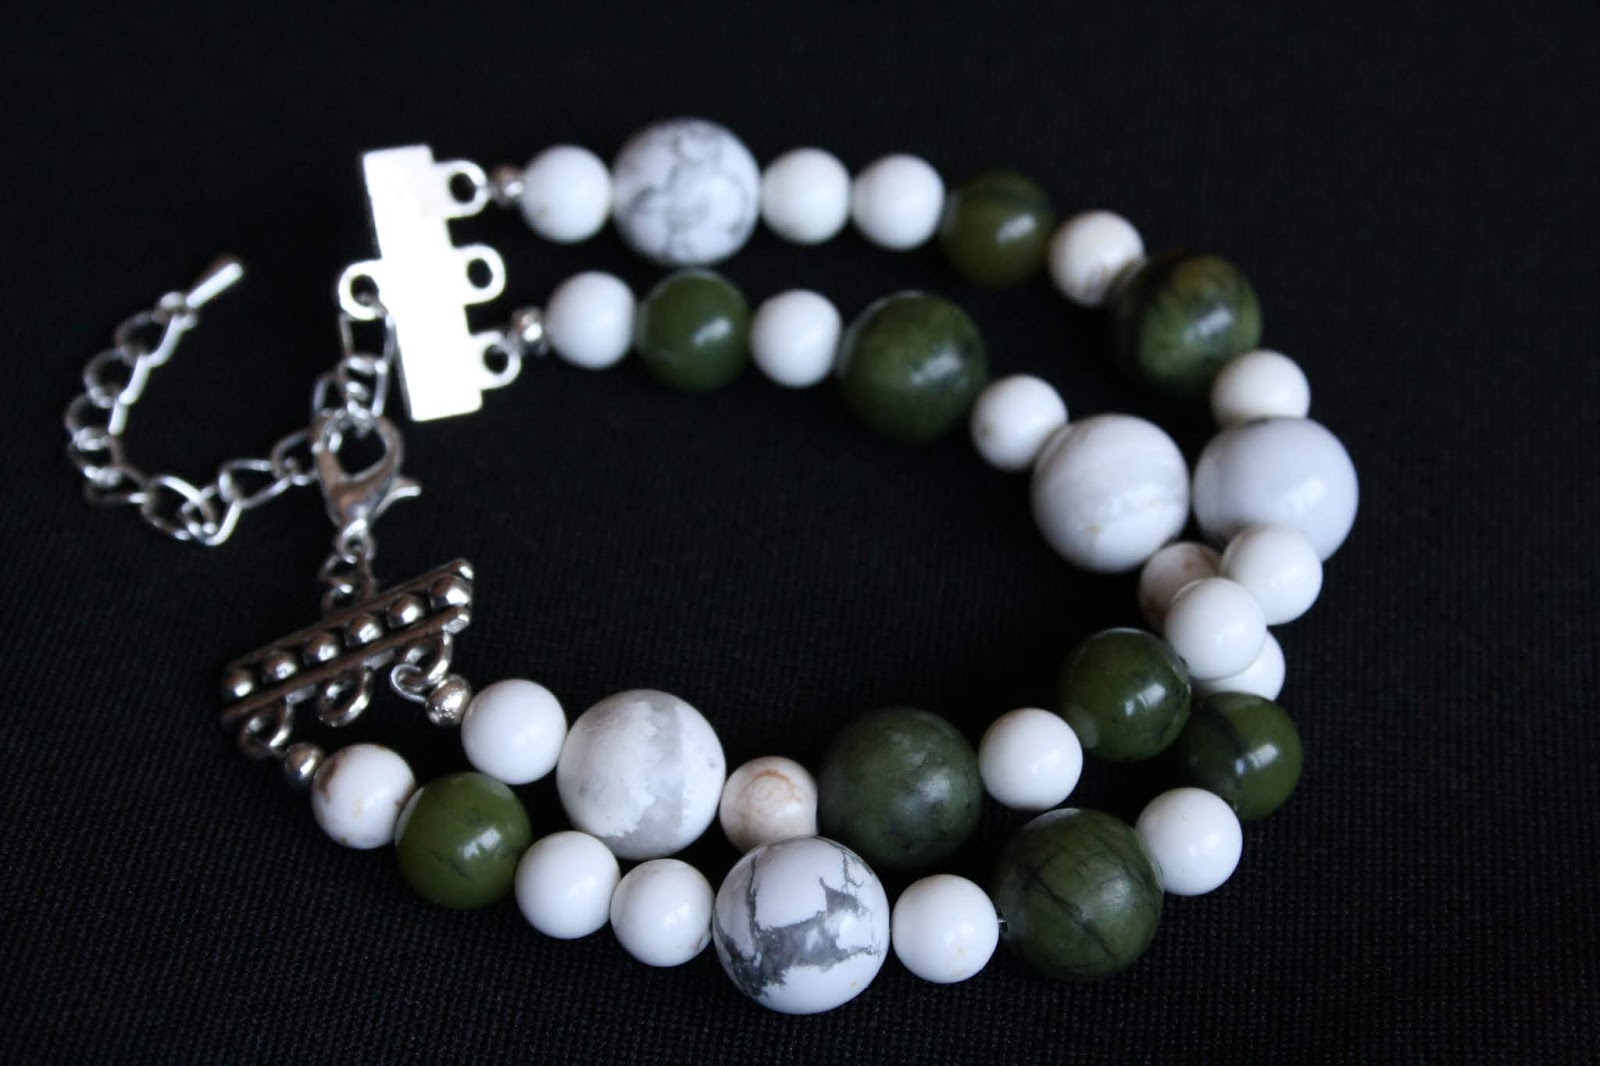
Natural Green Gemstone bracelet with White Howlite Accents

Natural Green Gemstone Bracelet with White Howlite Accents

Hello! Today on the blog, I will be sharing with you how to make a lovely green and white beaded bracelet, using the new JBNS range of beads from Just Bead It! The beautiful gemstone beads from Just Bead It are so fun to work with and the great range of colours and sizes makes every piece unique :)


Just Bead It products used:
  • Large green Canadian jade round beads - JBNS43
  • Medium green Canadian jade round beads - JBNS74
  • Small white magnesite spacer beads - JBNS50
  • Large white howlite beads - JBNS61
Additional products used:
  • beading wire
  • crimp beads
  • silver crimp covers
  • silver 3-hole bar ends
  • silver lobster claw clasp
  • silver extender chain
  • bent-nose pliers
  • round-nose pliers
  • crimping pliers


Firstly, to secure the first length of wire to the 3-hole bar end, thread the crimp onto the wire, then add the 3-hole bar end, then thread the crimp back through itself and secure with crimping pliers. Add a crimp cover over the top to hide the raw crimp. Next, begin to thread the first few beads onto the secured wire. 
The pattern is as follows (for the bottom strand): 
small white (JBNS50) > medium green (JBNS74) > 2x small white (JBNS50) > howlite (JBNS61) > small white (JBNS50) > large green (JBNS43) > start again and repeat until desired length is achieved.


You can now start on the second strand (the top strand). The pattern for the top strand is as follows:
small white (JBNS50) > howlite (JBNS61) > small white (JBNS50) > large green (JBNS43) > small white (JBNS50) > medium green (JBNS74) > 2x small white (JBNS50) > start again and repeat until desired length is reached. NOTE: Once you've finished one whole sequence,, you are acutally going to start again from the howlite part of the sequence (step 2), or else, if you start at the beginning and add another 1x small white, you will end up with 3x small white beads before the howlite. The picture below clarifies this pattern further.

As you can see, I added my crimp covers at this point, but it really doesn't matter if you place yours on at the beginning or end.

After the beads are strung, you can go ahead and attach both the wires to a second 3-hole bar end. Like before, add a crimp bead onto the wire, thread the wire through the bar end and back into the crimp bead. Create an indent using the crimping pliers, fold the crimp back onto itself for security, and fasten a silver crimp cover over the top to hide the raw crimp. Do the same with the second wire.


Once all the strands are secure, simply attach a lobster claw clasp to one end, and a silver extender chain to the other, and you're finished! That's how simple it is to make a lovely handmade beaded bracelet. The combination of green and white makes this a really natural and earthy piece that can blend into any style, whether casual or formal.

As a side-note, while photographing the bracelet, I've found that the camera doesn't quite pick up the green colour as nicely as I would have liked. In real life, the jade beads are a rich, deep green shade and the photos don't always accurately represent that. Green is such a beautiful colour, but can be very tricky to photograph sometimes...


I hope you enjoyed this post - hopefully this can inspire you to have a go at using some of the Just Bead It beads. Thanks for reading - happy beading!

If you would like to view more of my designs, I also have an Etsy store called 
DominiquesWares which features more beaded jewellery. This particular gemstone bracelet will soon be uploaded to my store, so stay tuned for that :)

If interested, you can follow me on Twitter @DominiquesWares

or Instagram: dominiques_wares

You can also follow my Dominique'sWares blog


Sunday, 24 February 2019

Luxe Bronze Beaded Howlite Choker

Luxe Bronze Beaded Howlite Choker

Hi there. Today I will be sharing a bronze-toned choker, featuring the howlite gemstone beads from Just Bead It, which give the design a luxurious feel.


Just Bead It products used:

  • JBNS61 - white, round howlite beads
  • JBI788 - glass bronze-toned seed beads
  • JBI86 - silver alloy bicone spacers

Additional products used:

  • silver beading wire
  • silver 3-strand bar ends
  • crimp beads
  • silver crimp covers
  • silver 3-strand connector beads
  • crimping pliers
  • wire cutters
  • bent-nose pliers

Firstly, cut two equal lengths of beading wire. Place one howlite bead on the centre of the top strand, and one silver bicone spacer on the centre of the bottom strand, right underneath it.


For the next roughly 2.5cm on both sides, evenly fill the top and bottom strands with bronze seed beads, then place a silver 3-strand connector bead on both sides. These connectors will keep the strands from spreading too much as you continue beading, and will help to add to the aesthetics of the finished necklace.


Continuing on the bottom strand, place about four bronze seed beads beside both of the connector beads on either side, then place one howlite bead on both ends. For the top wire, place about 3cm worth of seed beads on both sides, then place a silver bicone spacer on the ends. As you continue with the necklace, this basic zig-zag-like pattern between the howlite beads and silver bicones will provide continuity to the design and will help draw the eye.


Essentially repeat the previous step, except in reverse this time; place about 2.5cm worth of bronze seed beads after the howlite bead on the bottom strand, and place a silver alloy bead. On the top strand, place about 2.5cm of bronze beads and then place a howlite bead (do this on both sides of course). This step can be shown in the picture below.


Next, for the top strand, place four bronze beads and then thread the wire through a silver connector. On the bottom strand, place about 3cm of bronze beads and then thread that wire through the bottom-most hole in the connector as well.


For the last part of the choker, thread about 2.5cm of bronze beads after the connector bead on both strands, and on both sides of the necklace. This is going to be at the back of the neck when the necklace worn.


Lastly, to secure the necklace, place a crimp bead on each of the wires and use crimping pliers to fasten the strands to the holes in the 3-strand bar end. Place silver crimp covers over the top to hide the raw crimps. Then, simply add a silver lobster clasp to one end of the choker, and an extender chain to the other.

The necklace is finished! The beautiful howlite beads from the new Just Bead It range make lovely accent beads; perfect for adding a little bit of interest and an expensive feel to the finished piece.


If you would like to get more information on some basic jewellery-making techniques such as how to use crimp beads and covers, and attaching lobster clasps etc, you can refer to my more thorough jewellery tutorial on the Just Bead It blog.

I hope you enjoyed this post - if you would like to view more of my designs, I also have an Etsy store called DominiquesWares which features more beaded jewellery. This particular choker will soon be uploaded to my store, so stay tuned for that :)

If interested, you can follow me on Twitter @DominiquesWares
or Instagram: dominiques_wares

You can also follow my Dominique'sWares blog

Thanks so much for reading - happy beading!


Monday, 28 January 2019

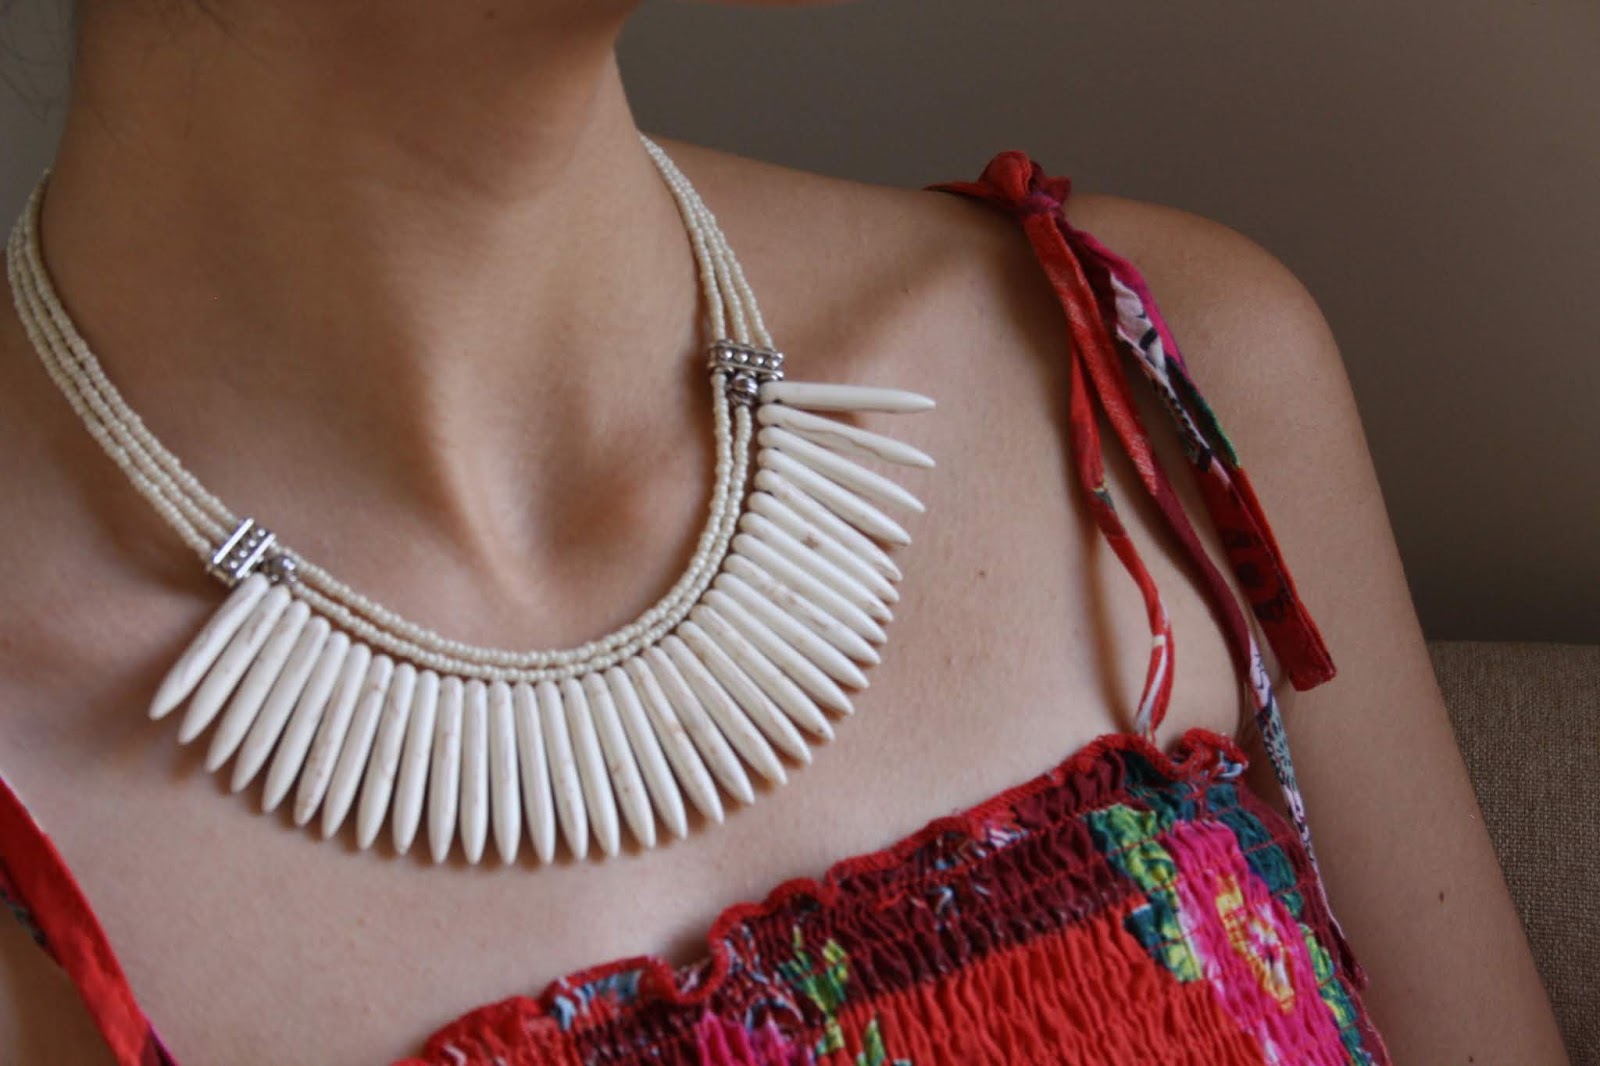
Tribal-themed Necklace and Earrings Set

Tribal-themed Necklace and Earrings Set

Hello! Today, I am going to share with you my most recent jewellery design - a modern tribal-themed necklace with matching earrings. At first, I was intimidated by the spike beads, and wasn't quite sure how I could use them in a project since they are not beads that I would typically gravitate towards. However, it's always good to go outside your comfort zone, and so I decided to give them a go. I'm pleased to say that I love the end result, and am very excited to share the finished piece with you today on the blog :)


Just Bead It products used:
  • JBI94 - glass ivory seed beads
  • JBI59 - metal spacer beads
  • JBI02 - howlite spike beads
Additional products:

  • crimp beads
  • silver crimp covers
  • silver Tibetan-style 3-hole connecter beads
  • beading wire
  • wire cutters
  • crimping pliers
  • metal 3-hole bar end
  • silver lobster clasp
  • silver extender chain
  • round-nose pliers
  • bent-nose pliers
  • surgical steel earring hooks
JBI59 metal spacer beads not shown, as I decided to add them later (as well as some other materials). Therefore, picture above is a general guideline, not exact. See full materials list above for an accurate list of products used.


NOTE: Although I usually provide in-depth instructionals with step-by-step processes, I was unable to do that this time since I pretty much adapted my design as I went along. As such, some pics may be less in-depth and accurate, due to certain changes in the design, but I will still accurately describe what I did to complete the necklace set.


To begin, start by threading the JBI02 howlite spike beads onto a length of wire. Don't tie off one end with a crimp bead, since you will need to add beads onto both sides of the wire, and add and take away, depending on the desired length. Also, set aside two of the spike beads for the earrings later on.


Next, add a silver connector bead onto both ends of the wire, making sure to thread the wire through the bottom-most rung on the connector.


Add the JBI94 seed beads on both sides of the connectors until you have reached the desired length.


Starting on the second strand, thread a long stream of JBI94 seed beads until you have reached the length of the spike beads. I used a bead board during all these steps, so that the bottom strand could be slightly curved into the shape it would roughly be in when worn, in order to more accurately measure the correct amount of beads needed to complete a necklace that sits nicely on the neck.

Once the seed beads line up with the length of spike beads, add one JB59 metal spacer bead on either side of the middle strand. You will probably need to take a few seed beads off, so that the quantity of beads once again lines up with the length of spike beads on the bottom strand. Then, thread the wire through the second hole on the metal connector bead on either side. Continue adding seed beads on the other side of the connectors until the length lines up with the bottom strand of seed beads.


For the third and final strand, thread an appropriate amount of seed beads until the length lines up with the other strands, and snugly thread it through the metal connector. Continue stringing the beads until the desired length is reached.

Now, you can begin to tie off the design, by attaching the strands to a 3-hole bar end. I took extra care at this part to make sure that the length was exactly right, and that the necklace would fall properly without gaps in between the bottom two sections of seed beads above the spears. Start with the bottom strand with the spear beads, as this is the heaviest and most concrete part of the design.


As usual, use crimping pliers to attach a crimp and crimp cover, and trim the excess wire after tucking the tail through some beads first for extra security.

Do the same with the other two strands of wire, attaching them securely to their respective loops on the bar end.

Lastly, attach a silver lobster clasp and extender chain to their respective sides of the necklace.


And the necklace is now finished!

For the matching earrings, you will need to use the two spike beads that were saved when making the necklace, as well as two of the JBI59 metal spacers.


Simply thread an eyepin through the horizontal drill-hole on one of the spike beads, leaving about a centimetre of wire between the bead and the loop of the eyepin.


Next, bend the loop of the eyepin upwards, so that the loop rests above the top of the spike bead.


Finally, taking the other side of the eyepin, twist the excess wire around the top of the eyepin about three times so that it neatly secures the loop in place. Trim the wire as close as possible to the loop, to make sure there are no rough edges poking out. Repeat this step one more time for the second earring.


Next, take an eyepin and thread it through the JBI59 spacer bead, forming a loop on the top and bottom. Attach this to the loop on top of the spike bead, and then attach this to an earring hook. Repeat with the other earring.


And there you have it! I went a little out of my comfort zone this time with a design that is fairly different to what I would typically make. However, I really love how this turned out, proving that it's good to step outside your creative boundaries from time to time, and experiment with new ideas! I even tried a bit of basic wire wrapping for the first time with the earrings... Not as easy as it looks I must say! But the end result worked out pretty well, so I'm pleased at that at least :)

I hope this inspired you to have a go at trying some of the Just Bead It beads. Thanks for reading! Happy beading!


If you would like to view more of my designs, I also have an Etsy store called 
DominiquesWares which features more beaded jewellery. This particular tribal necklace and earrings set will soon be uploaded to my store, so stay tuned for that :)

If interested, you can follow me on Twitter @DominiquesWares

or Instagram: dominiques_wares

You can also follow my Dominique'sWares blog