Friday, 11 October 2019

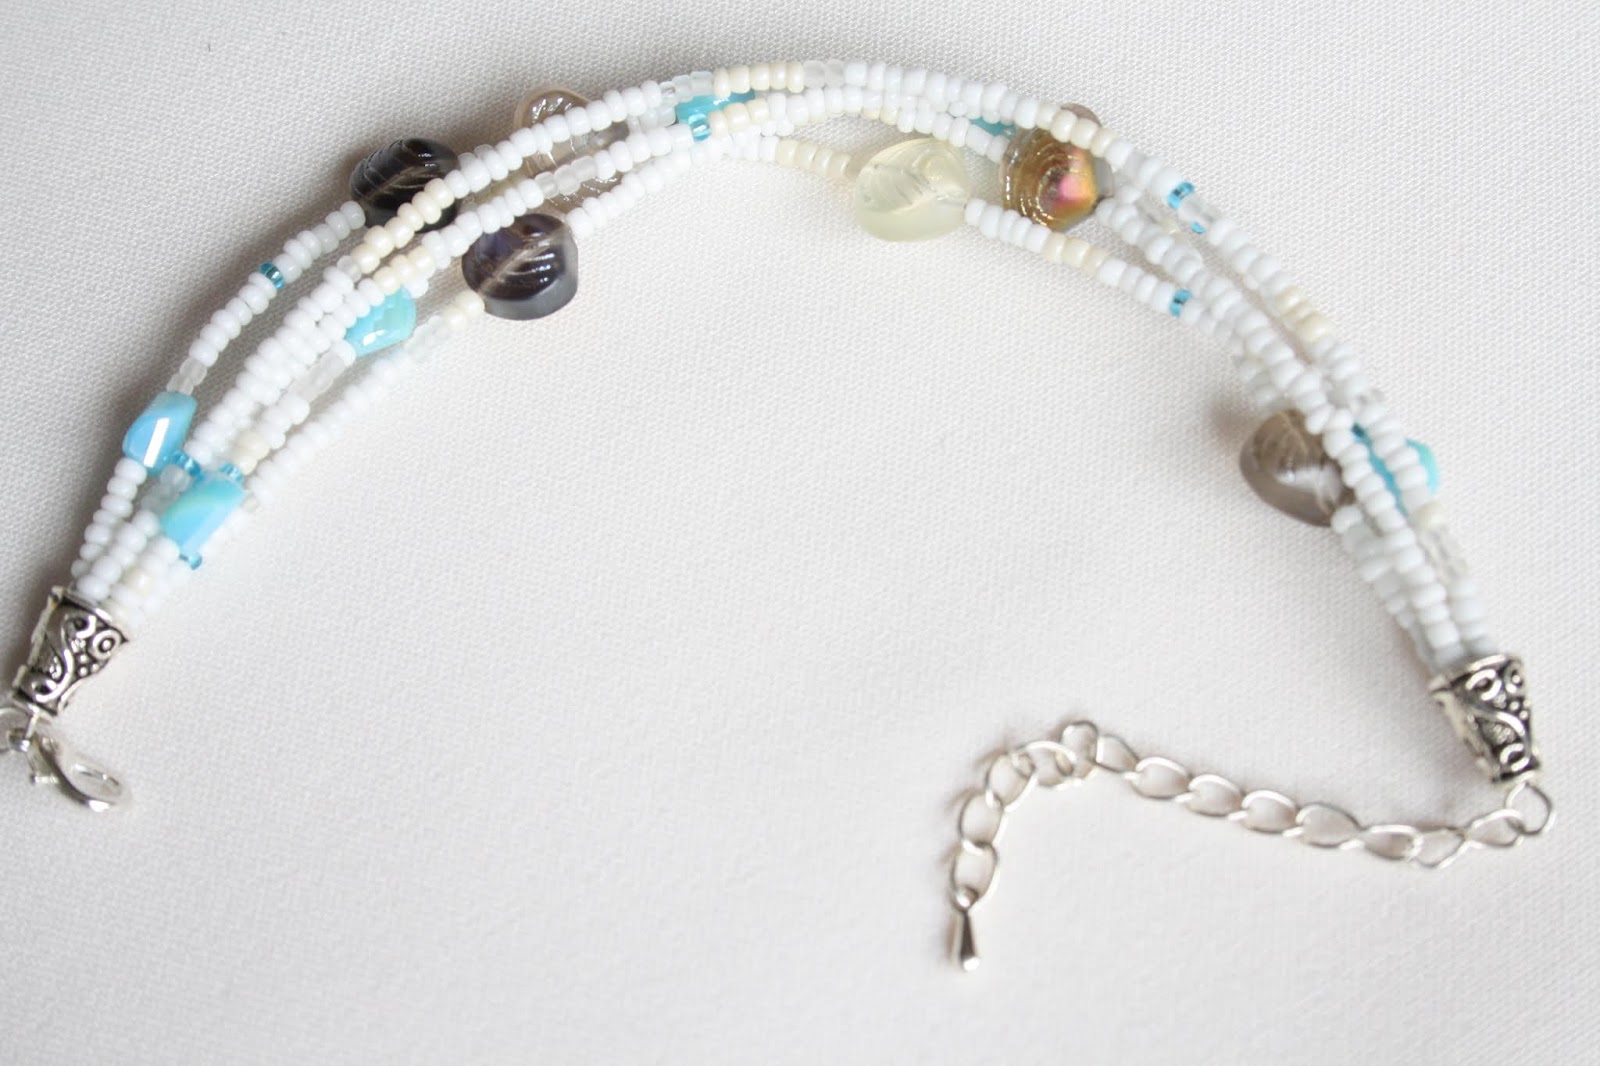
Dainty Seashell Beach Bracelet

Dainty Seashell Beach Bracelet

Hi there! It's Dominique here, and today on the blog, I am going to show you how to make a dainty, beach bracelet, using the newest bead range from Just Bead It! I am focusing on the adorable glass seashell beads for this main feature of this design, which reflect in the light to show different iridescent colours, depending on how you look at them. I have also used a new technique today, which involves a metal finding that I have never used before; bead cones! I really love the look they give to the finished design; all the strands are compact at each end, and in the middle they fan apart to show the design clearly when worn. Without further ado, let's get started.


Just Bead It products used:
  • JBRF46 - Aqua, glass, twist beads
  • JBRF15 - Glass sea shell beads
  • JBZ56 - Small white seed beads
  • JBI94 - Small ivory seed beads
Additional products used:
  • Small frosted glass seed beads
  • Silver bead cones (x2)
  • Silver headpins (x2)
  • Silver lobster clasp (x1)
  • Silver extender chain with teardrop charm (x1)
  • Beading wire
  • Crimp beads (x10)
  • Crimping pliers
  • Wire cutters
  • Round-nose pliers
  • Bent-nose pliers


Firstly, this bracelet has five strands in total, so cut five equal lengths of beading wire. Using one strand at a time, begin threading a random assortment of seed beads, shell beads, and aqua twist beads. The bracelet should look effortless, so randomness is key. 


As you are beading each strand, compare it to the previous one to give an indication of where you should be placing the beads, in order to keep the pattern sporadic. There shouldn't be beads in the same place on each strand, as this will interfere with the flow and shape of the design.


This beading pattern is repetitive, and continues for all five strands, so keep beading until you are happy with the randomness and length of the design. One last important step before we get to the bead cones: make sure that the last ~2cm of each strand consists of seed beads, as these will fit snugly within the bead cones (while the larger beads won't).

The only perhaps 'tricky' part of this bracelet is using the bead cones, simply because of how many crimp beads need to be used in such a small space. Nevertheless, hopefully you will follow along :)

First, arrange the strands in the order you want them to appear when the bracelet is worn, and place a single crimp bead on the end of every strand. Then, take a silver eye pin and thread it through all of the wires on one side. 


For each wire, you will need to thread the strand into its respective crimp bead on the other side of the eye pin loop, and pull tight (also, I recommend letting some of the wire thread through a few of the seed beads for extra security). Then, take your crimping pliers and press to secure the crimp bead in place. Wire cutters can then be used to trim the tail. Make sure any excess wire is tucked into the beads in front.

This step is repeated for all five wires.


Once you have successfully secured each of the wires and their crimps onto the eye pin, you can now add the bead cone.

Simply thread the long, untrimmed tail of the eye pin through the wide end of the bead cone so that all the exposed crimps fit under the cone, and the eye pin's tail sticks out at the smaller end. Then, take the tail of the eye pin and bend it to a 90degree angle, and cut the excess so that a tail of about 1cm remains. With the remaining tail, use round-nose pliers to turn the wire upward and toward yourself, forming a tight loop. This should effectively secure the eye pin in place.


Next, repeat the same  steps on the other side of the bracelet: secure the wires to the eye pin loop with crimps > thread the eye pin through the bead cone > form a tight loop with pliers. 


Once this is done, the bracelet is almost done. Just attach a silver lobster claw clasp to the eye pin loop on one end, and a silver extender chain to the other! Do this by using bent-nose pliers to twist the loop open, add the metal finding, and close shut. I love how using the bead cones causes the wires in the middle of the bracelet to naturally twist ever so slightly, showcasing all the different strands in an interesting way.


Hooray! The bracelet is done! I really enjoyed working with the newest range of Just Bead It beads and I hope you enjoyed this tutorial blog as well!




If you would like to view more of my designs, I also have an Etsy store called 
DominiquesWares which features more beaded jewellery. This particular rose quartz bracelet will soon be uploaded to my store, so stay tuned for that :)

If interested, you can follow me on Twitter @DominiquesWares

or Instagram: dominiques_wares

You can also follow my Dominique'sWares blog


Monday, 16 September 2019

Delicate Rose Quartz and Golden Bracelet

Delicate Rose Quartz & Golden Bracelet

Hi there! Today on the blog, I am going to show you how to make a dainty beaded bracelet using the stunning rose quartz and faceted glass beads from Just Bead It. I have been eyeing these rose quartz beads in my stash for quite some time, and now I've finally gotten around to using them in a design that is befitting of their beauty! I'm really happy with how this one turned out; it's feminine and princess-like, and perfectly pale pink! For this bracelet I decided to use gold eyepins rather than beading wire, as the gold brings out a rose-gold-like finish to the design, all the while adding space between each bead to allow the soft pink tones to stand out. This bracelet is also finished with a handmade extender chain that mirrors the design in a more personalised format than if you were to use a simple store-bought chain. This bracelet would be perfect for a graduation present, birthday gift, or really any other special occasion! Without further ado, let's get started.


Just Bead It products used:

  • JBNS16 - Large rose quartz beads
  • JBNS09 - Small rose quartz beads
  • JBSV20 - Champagne glass faceted beads

Additional products used:

  • Wire cutters
  • Round-nose pliers
  • Bent-nose pliers
  • Gold eye pins
  • Gold jump rings (x2)
  • Gold lobster claw clasp
  • Gold teardrop charm


To begin, take a gold head pin and thread it through the JBNS16 rose quartz bead. Then, carefully bend the tail of the eye pin to a 45 degree angle, and use wire cutters to cut the wire to about 1cm in length. 


Next, grip the end of the tail with round nose pliers and gently curl the wire into a tight loop, being very careful not to scrape the glass bead with the wire or the pliers. After you have completed these steps, you should have a beautiful rose quartz bead fitted with gold loops on either side, ready to be linked with the other beads that are treated in the same manner.


Repeat these steps with the other beads to accumulate a bunch of bead "charms" that can be linked together to form the pattern of the bracelet. 


The beads can now be linked together in the pattern: JBNS16, JBNS09, JBSV20, JBNS09, and so on... basically, there is a small rose quartz bead after every other bead, and either a large rose quartz or champagne faceted bead in between the small rose quartz beads, in an alternate fashion.


Once you have reached the desired length, the next step is to add the second chain to make this a multistrand bracelet. To do this, stop beading with the first chain, and start an entirely new chain in the same pattern, except, start the pattern with a different bead to offset the two strands. You can start the pattern in whatever order you like, as long as you keep it consistent and make sure the beads on either strand aren't directly parallel with each other (we want to have some differentiation between the two). 
The good thing about using eye pins is that, if you make a mistake with the pattern, or your preferences simply change, it is super easy to go back and switch out some beads to your liking. 


Keep making bead 'charms' with the eye pins and linking them together, following the same pattern in a different order, until the second strand is identical to the first in length. Then, take a gold jump ring (or make one yourself as I did, by curling a jump ring into a loop with round-nose pliers) and attach both of the chains to it by twisting the jump ring open, placing it through both loops from either chain, and gently closing it shut. This step will be repeated on both sides of the design, so that the two chains are linked together side by side.


Finally, once the chains are linked together (side-by-side) by the jump rings, the final step is to make an extender chain. You could of course use a previously purchased extender chain and it would be just as functional, but what's the fun in that? Plus, by making your own, you have the chance to use some of the beads from your bracelet to reinforce the colours of the design!
To make the extender chain, create a small chain with an alternating pattern of small rose quartz (JBNS09) and champagne faceted (JBSV20) beads. We aren't using the larger rose quartz (JBNS16) beads this time, because we want this extender chain to be a bit lighter and more understated. Once this is done, simply add a gold teardrop charm to one end, and attach the other end to a jump ring on one side of the design.


Lastly, add a gold lobster claw clasp to the other remaining end of the design, and the bracelet is complete!!


I hope you enjoyed this post - hopefully this can inspire you to have a go at using some of the Just Bead It beads. Thanks for reading - happy beading!


If you would like to view more of my designs, I also have an Etsy store called 
DominiquesWares which features more beaded jewellery. This particular rose quartz bracelet will soon be uploaded to my store, so stay tuned for that :)

If interested, you can follow me on Twitter @DominiquesWares

or Instagram: dominiques_wares

You can also follow my Dominique'sWares blog


Monday, 19 August 2019


Bohemian Chic Turquoise and Gold Beaded Necklace

Hello! Today on the blog, I am going to show you how to make a bohemian chic necklace, accented with faceted turquoise and bronze beads. My favourite thing about this design is the neckline; I just love the shape it gives which, to me, is reminiscent of something a princess would wear :) This design is a bit of a blast from the past as I am using some of the Just Bead It beads from an earlier range. They are so beautiful that I couldn't resist!  I hope you enjoy!


Just Bead It products used:
  • JBX29 - bronze faceted rondelle beads (medium)
  • JBX36 - bronze faceted rondelle beads (large)
  • JBY49 - turquoise faceted beads
Additional products used:
  • gold eyepins (and lots of them!)
  • gold headpins
  • gold lobster claw clasp
  • gold jumprings
  • wire-cutters
  • round-nose pliers
  • bent-nose pliers


I love this type of necklace because there are no crimps involved, and each of the beads are spaced apart by the eyepins, so they are highlighted individually. It's also very easy to adjust and change the length of the design, even after you are finished. You can simply take some of the links off, or add some on, with no extra hassle of having to start over.
Having said that, let's begin!

Firstly, start by creating a few mini turquoise 'charms' as I like to call them, because they have loops on either end that can be attached to a chain. To do this, thread a gold eyepin through one of the JBY49 turquoise beads, turn it on a 90degree angle, and cut the wire, leaving about a centimetre to work with. Then - using round-nose pliers - gently turn the remaining wire upwards until it forms a loop that is flush with the hole on the bead. And that's it! This exact process is repeated many times with the other beads as well, and then you just link all of them together to form the necklace. 


For the pattern, start by threading two links of the turquoise 'charms' (you can always come back and add more if you want the necklace to be longer). To link them together, use bent-nose pliers to grip one end of the loop, and gently twist it into an 's' shape while gripping the bead with your other hand as an anchor. Then, simply add it to the closed loop of another link, and firmly close the 's' back into a loop using bent-nose pliers again.

Be careful when doing this process with the bronze rondelle beads, however, as the glass is fragile and if you are too rough with the pliers, you could break some of the bead.


Continuing the pattern, make a 'charm' using the JBX29 medium bronze bead, and link it onto the chain you have already started. Continuing on, add another two turquoise links, and then the first JBX36 large bronze bead. 


Then, add three more of the turquoise links in a row, and start back with another medium bronze bead (JBX29).

So to recap: 2x turquoise, 1x medium bronze, 2x turquoise, 1x large bronze, 3x turquoise, 1x medium bronze

And that is the basic pattern for the first part of the necklace.

If you want, you can add the lobster claw clasp now to remember which end of the chain you started with


Next, once you have reached the desired length of the necklace, you will need to find the middle of the necklace and start continuing the pattern downward. To do this, continue the pattern as normal, but attach the next link vertically, so that its top loop is linked with both the chains above it, and the 'charm' is facing downward. From then on, it is simple to continue the pattern downward until you have reached the desired length. Just make sure that the other side of the necklace is even, by going back and making sure to reverse the pattern so that it continues downward in a direction facing the opposite side of the necklace. For example, after the central JBX29 medium bronze bead, usually there would be two turquoise beads to follow if the pattern was going in the same direction, however, to reverse the pattern, there will now be three turquoise beads, followed by the large bronze JBX36 bead. As you can see below, the pattern now lines up and the direction follows the central bead, starting from either side of the necklace.


I was originally going to add a turquoise oval bead at the bottom end of the necklace, but I decided against it at the last minute, and elected instead to go with one of the medium bronze beads (JBX29) for a more subtle look.


Whatever bead you decide to go with for the end, you will need to use headpins, rather than an eyepin, as it is the final 'charm' and does not need to link with anything else. The headpins I were using had too small a base, so I improvised and used a group of three and thread them through the bead instead to widen the base (or else a single headpin would have slipped through the bead hole). This worked fine, although it was a bit tricky to curve all three wires into a loop in the same motion. Then, I just added the final 'charm' onto a jump ring, and linked it to the rest of the design.

Finally, attach a gold jump ring to one side of the necklace, and a gold lobster claw clasp to the other end. I was going to use an extender chain, but due to the extra chain in the centre of the necklace, any adjustability in the length of the necklace will result in the drop-length being uneven, which is not what we want. Therefore, only a jump ring attachment can be used for this one.
Add a lobster claw clasp and jumpring and you're done! NOTE: this photo shows that I decided to elongate the necklace slightly by adding a few more turquoise beads at the top than I started with.


And voila! The necklace is finished! I love the effect that the extra chain length gives at the end. If you prefer, you can keep adding links to the start of both sides of the necklace, which will elongate the design and give a more triangular neckline as it becomes longer. Alternatively, a shorter length will result in a more curved shape as it fits more closely around the neck. There is a lot of variety with this necklace, which I love :)


I hope you enjoyed this post - hopefully this can inspire you to have a go at using some of the Just Bead It beads. Thanks for reading - happy beading!

If you would like to view more of my designs, I also have an Etsy store called 
DominiquesWares which features more beaded jewellery. This particular boho-chic necklace will soon be uploaded to my store, so stay tuned for that :)

If interested, you can follow me on Twitter @DominiquesWares

or Instagram: dominiques_wares

You can also follow my Dominique'sWares blog