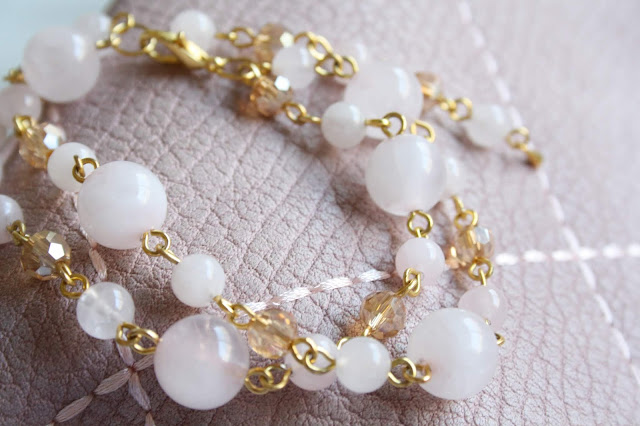
Delicate Rose Quartz & Golden Bracelet
Hi there! Today on the blog, I am going to show you how to make a dainty beaded bracelet using the stunning rose quartz and faceted glass beads from Just Bead It. I have been eyeing these rose quartz beads in my stash for quite some time, and now I've finally gotten around to using them in a design that is befitting of their beauty! I'm really happy with how this one turned out; it's feminine and princess-like, and perfectly pale pink! For this bracelet I decided to use gold eyepins rather than beading wire, as the gold brings out a rose-gold-like finish to the design, all the while adding space between each bead to allow the soft pink tones to stand out. This bracelet is also finished with a handmade extender chain that mirrors the design in a more personalised format than if you were to use a simple store-bought chain. This bracelet would be perfect for a graduation present, birthday gift, or really any other special occasion! Without further ado, let's get started.
Just Bead It products used:
- JBNS16 - Large rose quartz beads
- JBNS09 - Small rose quartz beads
- JBSV20 - Champagne glass faceted beads
Additional products used:
- Wire cutters
- Round-nose pliers
- Bent-nose pliers
- Gold eye pins
- Gold jump rings (x2)
- Gold lobster claw clasp
- Gold teardrop charm
To begin, take a gold head pin and thread it through the JBNS16 rose quartz bead. Then, carefully bend the tail of the eye pin to a 45 degree angle, and use wire cutters to cut the wire to about 1cm in length.
Next, grip the end of the tail with round nose pliers and gently curl the wire into a tight loop, being very careful not to scrape the glass bead with the wire or the pliers. After you have completed these steps, you should have a beautiful rose quartz bead fitted with gold loops on either side, ready to be linked with the other beads that are treated in the same manner.
Repeat these steps with the other beads to accumulate a bunch of bead "charms" that can be linked together to form the pattern of the bracelet.
The beads can now be linked together in the pattern: JBNS16, JBNS09, JBSV20, JBNS09, and so on... basically, there is a small rose quartz bead after every other bead, and either a large rose quartz or champagne faceted bead in between the small rose quartz beads, in an alternate fashion.
Once you have reached the desired length, the next step is to add the second chain to make this a multistrand bracelet. To do this, stop beading with the first chain, and start an entirely new chain in the same pattern, except, start the pattern with a different bead to offset the two strands. You can start the pattern in whatever order you like, as long as you keep it consistent and make sure the beads on either strand aren't directly parallel with each other (we want to have some differentiation between the two).
The good thing about using eye pins is that, if you make a mistake with the pattern, or your preferences simply change, it is super easy to go back and switch out some beads to your liking.
Keep making bead 'charms' with the eye pins and linking them together, following the same pattern in a different order, until the second strand is identical to the first in length. Then, take a gold jump ring (or make one yourself as I did, by curling a jump ring into a loop with round-nose pliers) and attach both of the chains to it by twisting the jump ring open, placing it through both loops from either chain, and gently closing it shut. This step will be repeated on both sides of the design, so that the two chains are linked together side by side.
Finally, once the chains are linked together (side-by-side) by the jump rings, the final step is to make an extender chain. You could of course use a previously purchased extender chain and it would be just as functional, but what's the fun in that? Plus, by making your own, you have the chance to use some of the beads from your bracelet to reinforce the colours of the design!
To make the extender chain, create a small chain with an alternating pattern of small rose quartz (JBNS09) and champagne faceted (JBSV20) beads. We aren't using the larger rose quartz (JBNS16) beads this time, because we want this extender chain to be a bit lighter and more understated. Once this is done, simply add a gold teardrop charm to one end, and attach the other end to a jump ring on one side of the design.
Lastly, add a gold lobster claw clasp to the other remaining end of the design, and the bracelet is complete!!
I hope you enjoyed this post - hopefully this can inspire you to have a go at using some of the Just Bead It beads. Thanks for reading - happy beading!
If you would like to view more of my designs, I also have an Etsy store called
DominiquesWares which features more beaded jewellery. This particular rose quartz bracelet will soon be uploaded to my store, so stay tuned for that :)
If interested, you can follow me on Twitter @DominiquesWares
You can also follow my Dominique'sWares blog
DominiquesWares which features more beaded jewellery. This particular rose quartz bracelet will soon be uploaded to my store, so stay tuned for that :)
If interested, you can follow me on Twitter @DominiquesWares
You can also follow my Dominique'sWares blog


