Showing posts with label Multistrand Necklace. Show all posts

Friday, 13 December 2019

Glass Faceted Prismatic Multistrand Necklace

Glass Faceted Prismatic Multistrand Necklace


Hi there! It's Dominique here. Today on the blog, I am going to show you how to make an elegant multistrand necklace using the high-quality glass, faceted beads from Just Bead It. These beads are perfect for reflecting prisms of light, and would make the perfect showstopping piece for a special occasion such as a graduation or other event. The beads used in this piece are so unique and, by using eye pins to space each bead apart, I believe this design really showcases their individuality and prismatic nature.


Just Bead It products used:
  • JBSV84 - Diamond-shaped glass faceted beads
  • JBRF60 - Round faceted and offset bicone glass champagne-coloured beads
  • JBSV21 - Small bicone glass faceted champagne-coloured glass beads
Additional products used:
  • Gold eye pins
  • Small gold jump rings (x4)
  • Large gold jump rings (x2)
  • Gold chain segments (one with a teardrop charm, known as the extender chain, and one with a lobster claw clasp)
  • Gold lobster clasp
  • Bent-nose pliers
  • Round-nose pliers
  • Wire cutters

NOTE: I didn't end up using the JBSV07 beads in this design


The gold chains, lobster clasp and jump rings used in this design were actually repurposed from a vintage necklace that I found in an op shop! It was a great find, as the gold chains are of a very high quality, and I suspect them to be gold filled (rather than gold plated which is a lot more common). It pays to look around for secondhand jewellery in op shops, as you will sometimes find something that is of a high quality that can be taken apart and reused in a completely different design :)

Firstly, start by threading an eye pin through two of the offset-drilled champagne glass beads from the JBRF60 strand of beads, with a round gold spacer bead on either side (from the same strand of beads), as shown below. These beads protect the fragile glass beads from being scratched by the metal eye pin or pliers. Make sure that each of the offset beads oppose each other in orientation (so, if the top bead is facing upwards, the bottom bead should be facing downwards, and vice versa), in order to highlight their uniqueness.

Next, take round-nose pliers and turn the tail of the eye pin to a 90degree angle, and cut any excess wire so that only a tail of about 1cm in length remains.
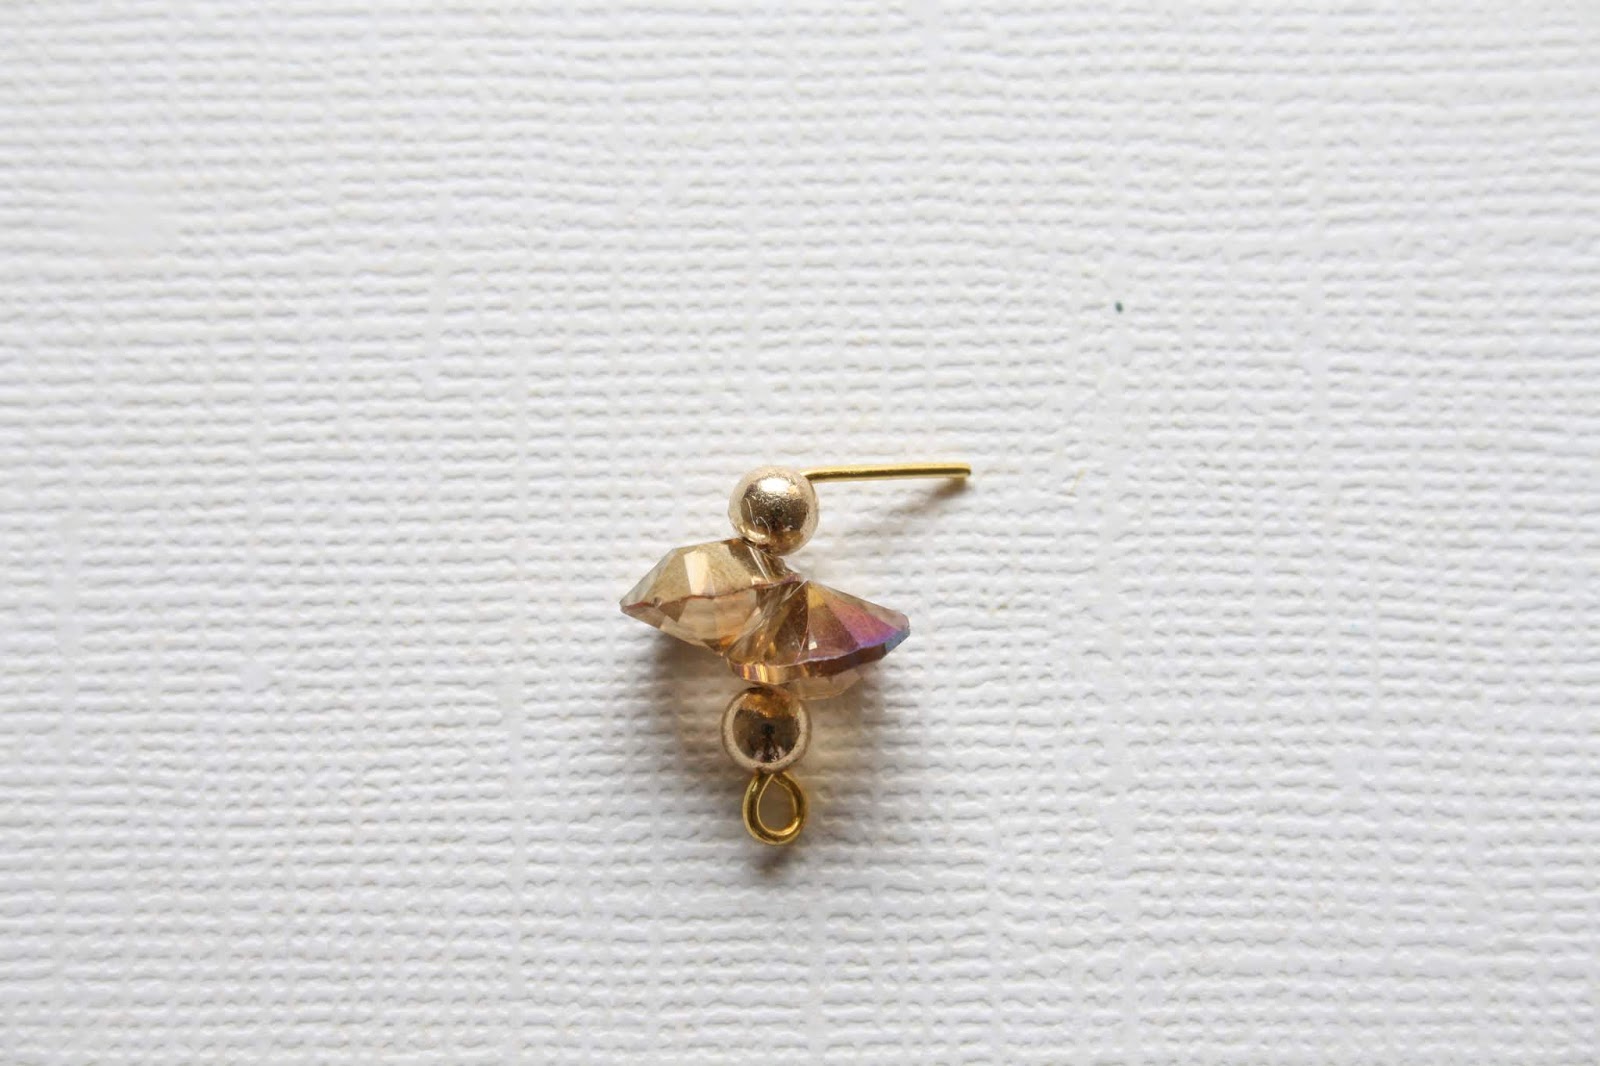
Then, take round-nose pliers again to grip the edge of the wire tail and gently turn it inwards until it forms a tight loop at the top of the bead. Shown below. 


I like to call these mini bead 'charms' or double-sided charms, since they will be linked together to form the necklace. So, after you've created one of these, you can proceed to thread an eye pin through the round faceted bead from the same JBRF60 strand of beads. This one doesn't need spacers on either side, so just thread the eye pin through as normal, and turn to a 90degree angle as before. Similarly, cut any excess wire and grip the edge of the wire tail, turning it towards yourself until it forms a tight loop (being very careful not to scratch the glass).


Now, you should have two 'charms' that will start to comprise the first strand of the necklace. Take a pair of bent-nose pliers and gently twist the loop on the eye pin (like an 'S' shape), to open in and link it to the adjoining bead 'charm'.


Continue making these bead 'charms' and linking them in an alternating fashion until the chain length reaches about 23cm in length.


Once you have reached a sufficient length for the first strand, set it aside and start working on the second strand. This one is shorter than the first as it is designed to fit above the first strand, and therefore must sit higher on the neck.

Start by taking two (JBSV21) small glass bicone beads and threading them through an eye pin just as before, and making them into a bead 'charm' using the technique mentioned earlier. Using the same technique, take one of the large diamond-shaped champagne glass beads from the JBSV84 strand, and thread it through an eye pin (with no spacers on either side). Again, carefully use the techniques already mentioned to turn it into a bead 'charm' with loops on either side, being very careful not to scratch the glass with pliers.

Once you make these charms, you can link them together by opening the loops on the eye pins, joining them to their neighbouring 'charms' and closing the loops back up.
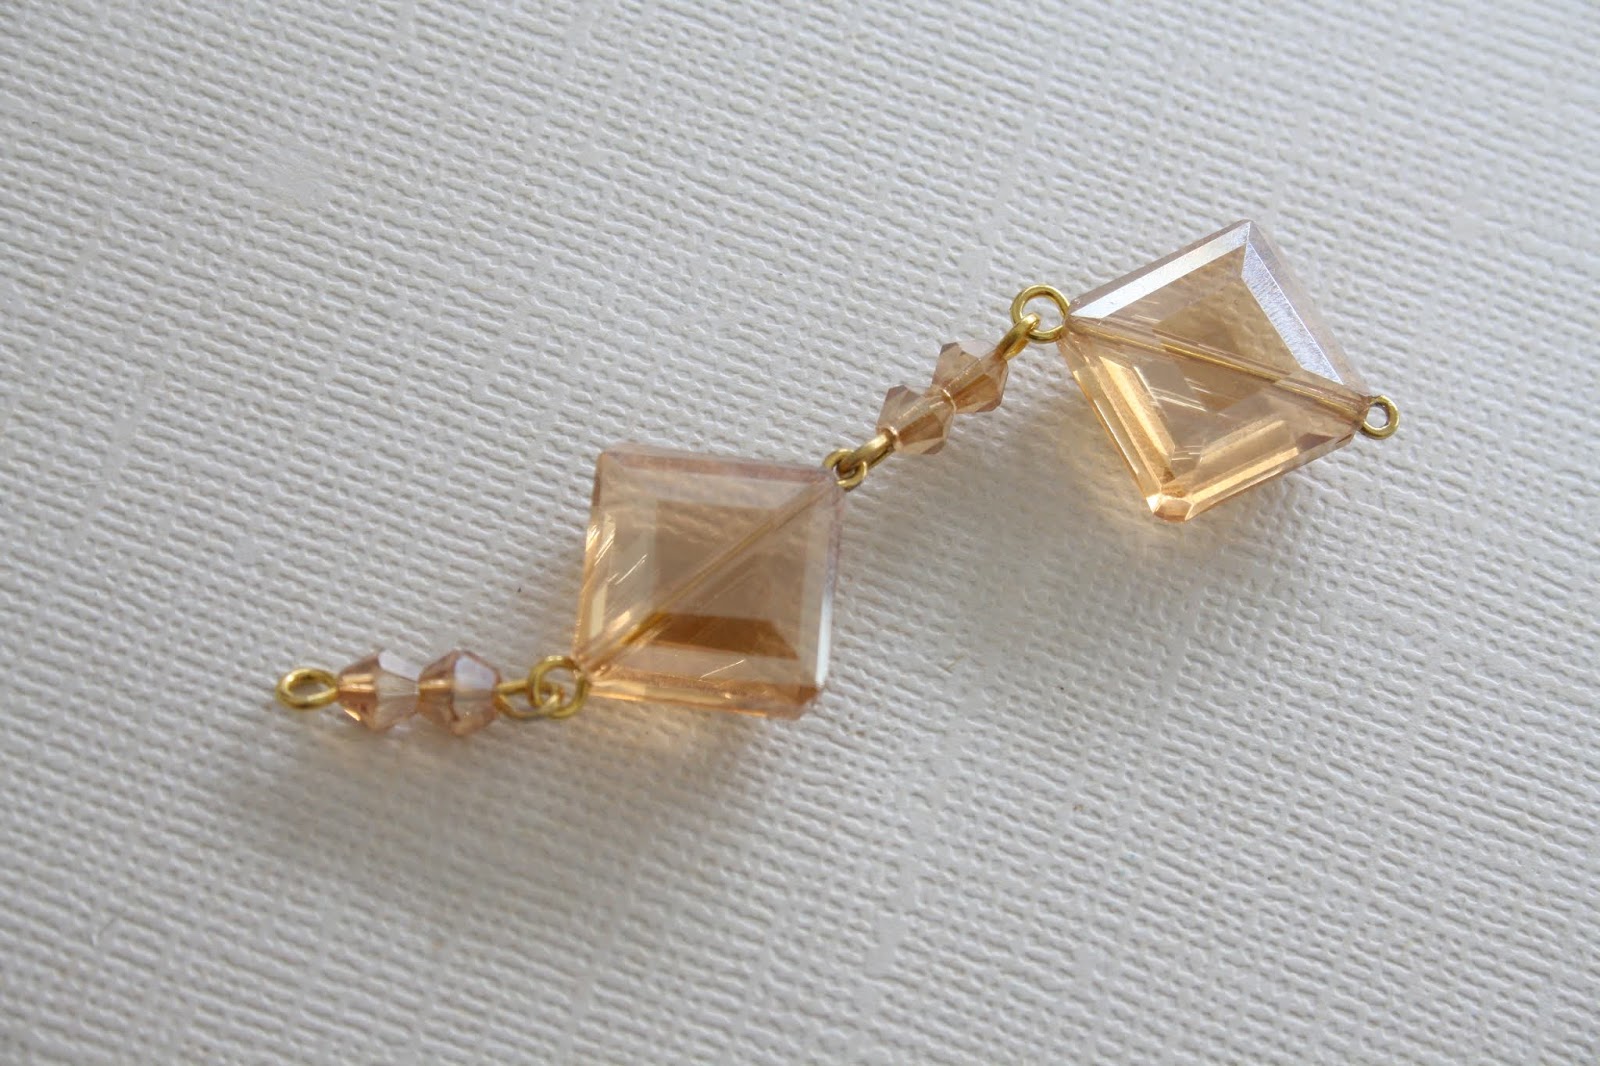


Continue making these bead 'charms' and linking them together until the chain reaches the desired length. For me, I used five diamond-shaped bead 'charms', and six small bicone bead 'charms' in total. This reached about 17cm in length, which in my opinion, was the perfect length in terms of the way the necklace fell when worn on the neck. The effect I wanted was for the necklace to have about two centimetres of space between the top and bottom chains when worn, so that the individuality of each bead and strand could be highlighted. If the chains were too close together, the beads wouldn't be showcased properly.


NOTE: I later decided that this length was too long, so I ended up removing one of the small bicone 'charms' on either side. As such, this length, in reality, only has a total of six small bicone bead 'charms', not eight as shown here.


Next, once you have two beaded chains that have each reached the desired length, you will need to attach small gold jump rings to both ends of both chains. Just like when joining eye pin links together, gently twist the jump ring open and attach it to the eye pin loop on the outer end of the chain. Repeat this on both sides of each length of beaded chain.

Once all the small jumprings have been attached, you can now add one large jump ring to complete both ends of the design. Use bent nose pliers and round-nose pliers (or flat nose pliers) to twist the large jump ring open, and attach one end of both chains to it, making sure that the large diamond-shaped beaded chain is above the other one. Close the jump ring and repeat the same thing on the other side, adding the other end to their own respective jump ring, and close shut.


Now, you should have both the chains joined together in a multistrand fashion. Now, to complete the design, add the chain segment with the teardrop charm (the extender chain) to the right side of the necklace in front of you, or the left side if you imagine the necklace on the wearer. Next, take the chain segment that contains a gold lobster clasp, and add that to the other side (the side of the necklace that is held in the right hand of the wearer as they fasten the clasp).


Now, the necklace is complete! This design is straighforward to make, yet produces a very effective necklace that is reflective and prismatic, which makes it a great statement piece for a special occasion, such as a graduation. I also adore the offset drilled champagne glass beads, as their unique side-drilled design is unlike any bead I've seen before. I've thoroughly enjoyed making this piece, and sincerely hope you've enjoyed this tutorial! This will be my last jewellery blog for the year, so I hope you have a Merry Christmas and a Happy New Year!

Thanks for reading, happy beading! :)


If you would like to view more of my designs, I also have an Etsy store called DominiquesWares which features more beaded jewellery. This particular multistrand faceted glass necklace will soon be uploaded to my store, so stay tuned for that :)

If interested, you can follow me on Twitter @DominiquesWares
or Instagram: dominiques_wares
You can also follow my Dominique'sWares blog


Monday, 27 May 2019

Earthy Bronze-toned Multistrand Beaded Necklace

Earthy Bronze-toned Multistrand Beaded Necklace

Hello! Today on the blog, I will be showing you how to make an earthy multistrand necklace, using an assortment of the lovely Just Bead It beads. For this design, I wanted the three strands to have a cascading effect of varying lengths, to really highlight the bronze-toned and green gemstone beads in each strand. I hope you enjoy!


Just Bead It products used:
  •  JBNS43 - Large Canadian Jade beads
  • JBNS74 - Medium Canadian Jade beads
  • JBNS36 - Small Canadian Jade Beads
  • JBNS61 - White Howlite Beads
  • JBNS67 - Medium White Magnesite beads
  •  JBNS50 - Small White Magnesite beads
  • JBI40 - Unakite beads (mottled green and red)
  • JBX36 - Large Bronze Faceted Glass beads
  • JBX29 - Medium Bronze Faceted Glass beads
  • JBX43 - Small Bronze Faceted Glass beads
  • JBX77 - Large Brass Beads
  • JBX60 - Medium Brass Beads
  • JBX53 - Small Brass Beads 
  • JBI59 - Alloy Fower-shaped beads
  • JBI86 - Alloy Bicone beads

Additional products used:
  •  Beading wire
  • Crimp beads
  • (bronze) Crimp covers
  • Crimping pliers
  • Wire cutters
  • Round nose pliers
  • Bent-nose pliers
  • 5-strand bronze bar ends (x2)
  • Bronze toggle clasp
  • Bronze/gold Jumprings (x2)
  • Gold eyepins
  • Gold spacer beads
  • Silver spacer beads
  • Bead board for planning pattern (optional)
Note: not all of what I used is in this picture, and some of the items shown here did not end up in the final design... see materials list above for an accurate list of all materials used


Firstly, start by attaching the first wire to the furthest loop on the 5-strand bar end (even though this is a 3-strand necklace, I wanted there to be some space between the strands, so to achieve this, the wires will be placed on the 1st, 3rd, and 5th loops in order to give the spaced-out effect I was after). To do this, place a crimp bead on the wire, thread the wire through the loop and back through the crimp and secure with crimping pliers. You can now place a crimp cover over the top to hide the raw crimp, as well as for added security.


Now, you can begin threading the beads. For each of the strands, I started by threading the same three beads just to give a bit of continuity. I started with a medium Canadian Jade bead (JBNS74) in between two silver spacers. For the rest of the design, the pattern of beads is supposed to be fairly random, but I planned what beads I was going to use on a bead board. You really just need to be adding a random mix of the seed beads (JBI788), the small and medium Canadian Jade (JBNS36, JBNS74), each of the white magnesite (JBNS50, JBNS67), and each of the sizes of bronze faceted beads (JBX36, JBX29, JBX43). Use the white howlite (JBNS61), Unakite beads (JBI40) and large green Canadian Jade beads (JBNS43) sparingly, because these are going to be the main focal beads. 


After you have strung about 10cm worth of beads, stop and make a mini charm attachment by using a gold eyepin, and one gold spacer bead on either side of a single JBNS43 Canadian Jade bead. Use round nose pliers to curl the other side of the eyepin toward the beads to form a single loop on both sides.


Now that you have this "charm" attachment, add a crimp bead to the wire you were working with before, then add a couple more seed beads, and thread the wire through one of the loops on the charm you just made, and back through the crimp.
Secure the crimp with crimping pliers, and add a crimp cover over the top.
Now, cut the long tail of wire (threading the excess through the other beads), and begin the rest of the necklace by adding a crimp to a new piece of wire, and threading it through the other loop on the "charm", and securing with crimping pliers. Adding a couple of seed beads before the crimp is a good way to let the crimp blend into the rest of the beads, and not stand out as much. Add a crimp cover over the top, and you can now begin to thread a random pattern of beads, just as before.


Thread the wire through the Jade charm and back through the crimp on the other side

Cut the tail of wire and tuck the excess into the beads before it

Add a crimp cover over the top of the raw crimp so it blends in with the rest of the design


This process continues for the rest of the necklace, adding a jade "charm" every 10cm or so, securing with crimps, and continuing the pattern. This method does take extra effort, but the end result will worth it because the necklace will be light and airy and won't be rigid like it might be if you simply added a straight pattern of beads.


 Continue this process of adding a random pattern of the beads listed above, and every once in a while, add some of the focal beads such as the white Howlite beads (JBNS61) and the mottled Unakite beads (JBI40). To frame these beads, I like to add one of the same types of beads on either side, such as two gold spacers or two small brass beads (JBX53). This just makes the focal beads stand out more within the design.

Once you are happy with the length of the first strand (keep in mind that the first strand should be the longest of the three in order to achieve a cascading effect of beads at the end result), you can secure it to the other bronze bar-end, and start the second strand (the middle wire). Just as before, add and secure a crimp bead and thread the same first three beads as before, for continuity's sake (1 silver spacer on both sides of a medium Canadian Jade bead (JBNS74)). Continue adding a random pattern of beads and attach a previously-made Canadian Jade charm every ~10-15cm of beads.

I added the bronze toggle clasp at this point because I wanted to test the necklace for size after I finished the first strand. If you're confident in the length you've chosen, you don't need to add the clasp until the end.


 "Just keep beading..." until you have finished all three strands :)


Once you are happy with the lengths of each strand, and the pattern is nice and varied, you can secure the last wire to the last loop on the bar end, and attach the toggle clasp if you haven't done so already. Simply add a jumpring to the outer loop of the bar end and attach a piece of the toggle to it. Do the same to the other side, and the necklace is done!


If you would like to get more information on some basic jewellery-making techniques such as how to use crimp beads and covers, and attaching lobster clasps etc, you can refer to my more thorough jewellery tutorial on the Just Bead It blog.

I hope you enjoyed this post - if you would like to view more of my designs, I also have an Etsy store called DominiquesWares which features more beaded jewellery. This particular necklace will soon be uploaded to my store, so stay tuned for that :)

If interested, you can follow me on Twitter @DominiquesWares
or Instagram: dominiques_wares

You can also follow my Dominique'sWares blog

Thanks so much for reading - happy beading!